Installing Electric Fireplace Insert

Electric Fireplace Insert Installation Guide

Magikflame
Magikflame

Our Insert
Installation Guide

How To Install Electric Fireplace Insert in 4 Easy Steps?

Download our insert installation guide and install Electric Fireplace Insert

Insert Installation Guide

Side by Side Comparisons. Installation Instructions. Dimensions.

Everything you need to know to install a MagikFlame Insert into your existing combustion fireplace. This detailed guide will cover dimensions, framing in your insert, wiring requirements, and building your own stacked stone surround and more. Enjoy side by side comparisons and learn what makes the MagikFlame the best Insert you can add to your living space.

Electric fireplace insert
Rectangle
NOTE: The MagikFlame has 2x Junction Boxes Located on the Back/Right That Adds Additional Width
Specs
DB-install

DragonBlaze Insert
Installation Guide

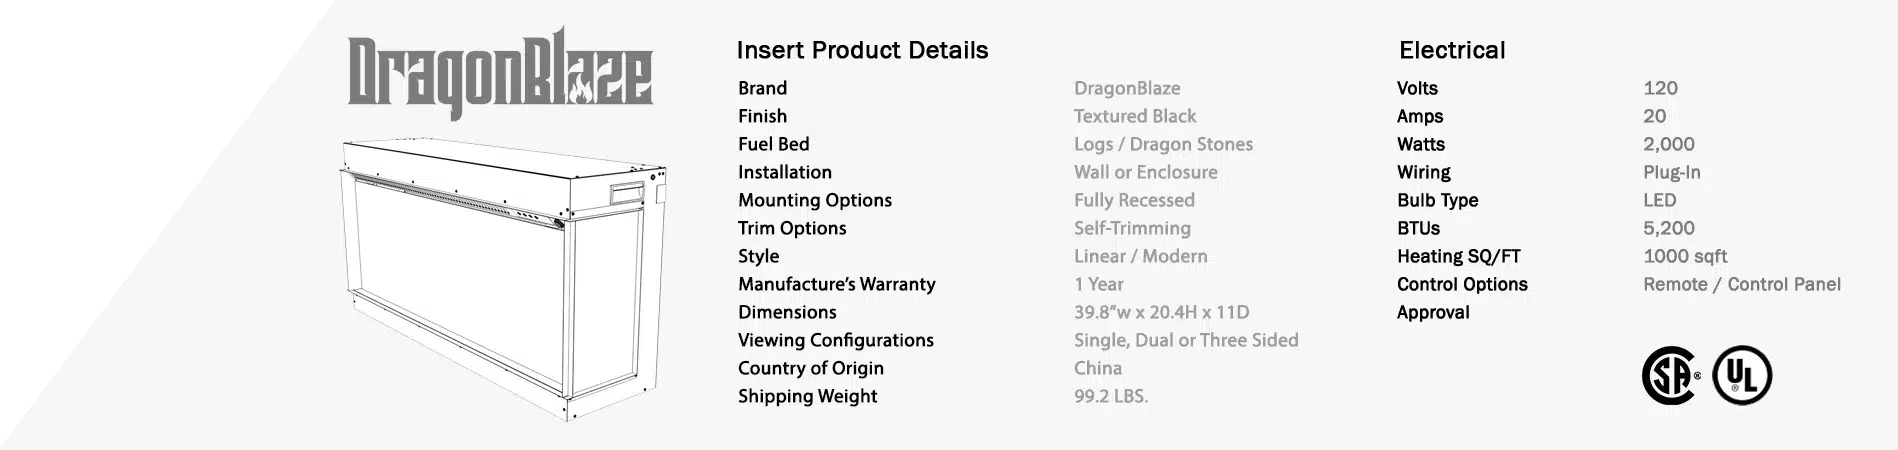
How To Install DragonBlaze Electric Fireplace Inserts?

Download the full DragonBlaze Installation guide and instruction manual.

Electric fireplace
Specs

Installation Questions

No professional is needed for the fireplace itself: the insert comes assembled, you fit the glass (two screws) and plug it in. We do not offer installation, because we ship nationwide. If you are building it into a wall or an existing fireplace, a local handyman or contractor (for example through Angi) can do the framing and electrical work; it needs no venting, and we will answer your installer's questions by phone 7 days a week.

The insert ships assembled: plug in the log set and fit the holographic glass, about 15–20 minutes. Mantels ship flat to protect them and go together like furniture in 20–30 minutes with a screwdriver; two people is easier. Needle-nose pliers help with the glass. Illustrated step-by-step instructions are included.

Follow the printed instructions and our glass installation video on YouTube (search "MagikFlame glass installation video"). Take your time and never force it; needle-nose pliers, a flashlight and a second person help. Call tech support if you get stuck.

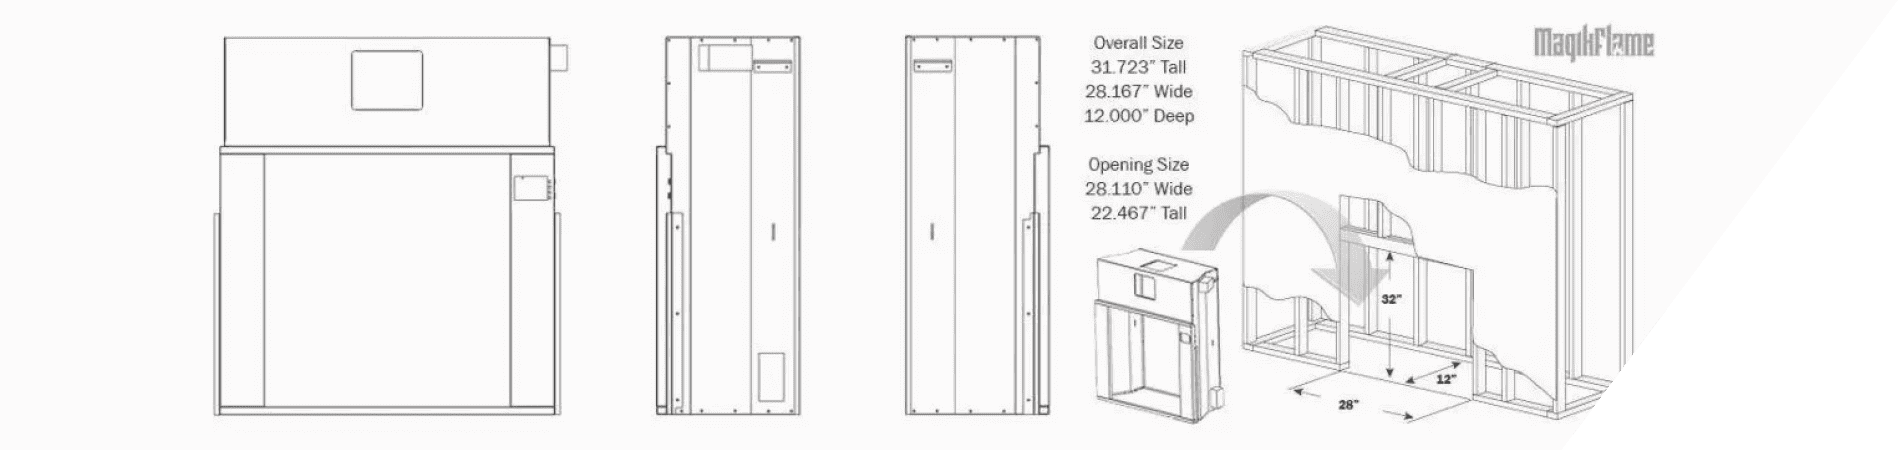
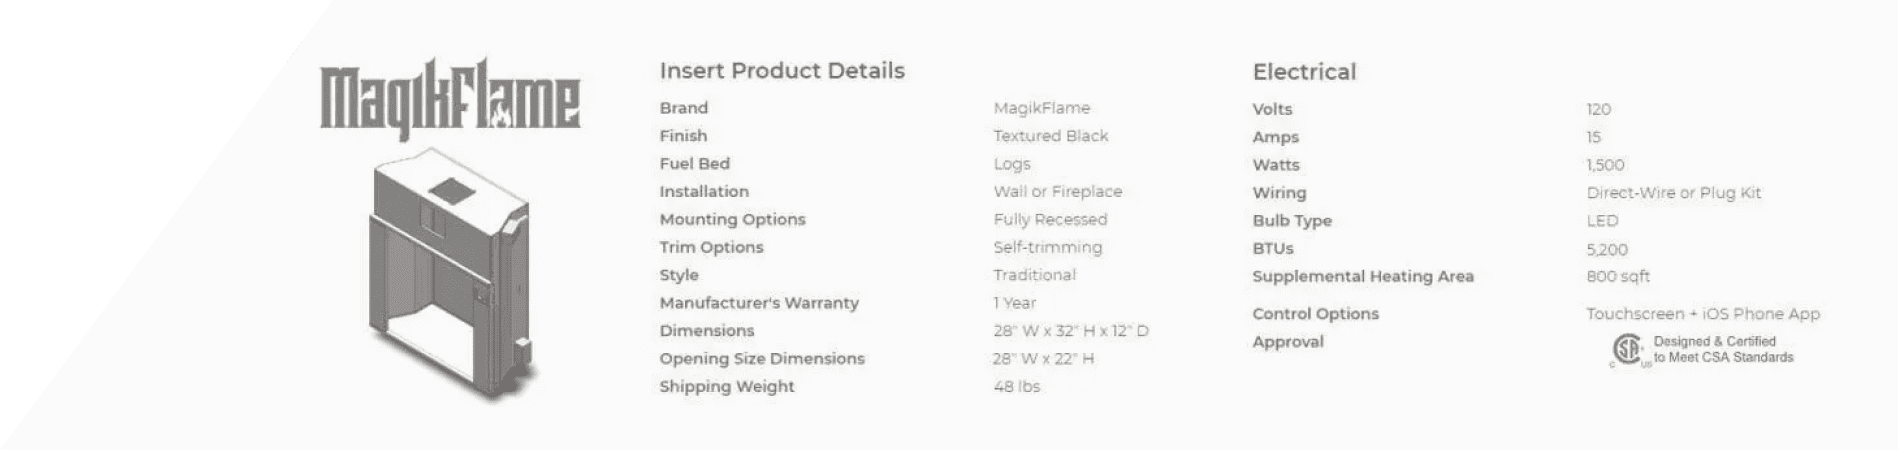
The insert is 28" wide x 32" tall x 12" deep. The viewable area is 28" x 22"; the top 10" holds the projection hardware and is meant to be framed or trimmed over. If your opening is wider or taller, frame around the insert with wood, stone or tile so it looks built in. If your opening is too short, check the height behind the front lip: most fireplaces get taller inside, so the insert can often sit a few inches back, like logs in a real fireplace. Do not build anything custom until you have the insert in hand.


They are access holes used when the electronics are installed, not vents, so they can be covered when you frame over the top 10". Because they are occasionally needed for repairs, consider making that trim removable.

Yes, and many customers do. Buy the insert on its own and build a surround or mantel from wood, stone or any material; the mantel is the frame around the fireplace. This page has the dimension diagram and a downloadable PDF with CAD drawings and electrical requirements. It can be plugged in or hardwired.

Two 6 ft grounded power cords come out of a junction box at the back right corner of the insert. Put the outlet to the right of the insert, not directly behind it, so the insert sits flush and the cords fit in the space beside it inside the mantel. A licensed electrician can hardwire it at the junction box instead.

No dedicated circuit is needed. A standard 15-amp breaker is enough; use 20 amps if other devices share the line. The heater draws 1,500 watts (about 12.5 amps) on its highest setting.

Only on the top cord (the electronics), and use a good-quality surge protector. The bottom cord powers the 1,500-watt heater: always plug it straight into the wall, never into a power strip or surge protector, because it can overheat.

It is a good idea. A switch lets you cut power when you are away for weeks, and makes it easy to reset the fireplace without unplugging it or going to the breaker.

Yes, if you notch the baseboard on both sides of the mantel and put the outlet to the right of the insert. Have the mantel in hand before cutting anything. A small gap behind the mantel is in shadow and is hardly noticed if you prefer not to notch.

For the best view, raise the insert 6–12 inches off the floor; 9 inches or more is ideal.

Yes. The heat blows forward into the room, not down. Just keep anything flammable away from the front of the heater.

The insert weighs about 48–50 lbs and its box has handles. A mantel package is about 150 lbs, but the mantel ships flat, so you can carry the panels in one at a time; nothing weighs much more than 50 lbs.

Indoors only. The electronics are not water-resistant and can be damaged by moisture, heat or cold, and outdoor use voids the warranty. It is not designed specifically for RVs, but it can be used inside one.

Yes, but there will be a metal strip between the two viewing areas.